HAND PROCEDURES
ARTIFICIAL JOINT REPLACEMENT OF THE FINGER
Overview
This procedure, performed under regional or local anesthesia, replaces a diseased or damaged finger joint with an implant made of silicone rubber or hard metal, ceramic or pyrocarbon. This technique can be used to replace the middle joint of the finger (called the PIP joint) or the joint at the base of the finger (called the MCP joint).
After anesthesia is administered, the hand is cleansed and sterilized. The patient is positioned so that the surgeon has access to the back of the fingers.
Accessing The Fingers
The surgeon creates an incision along the back of the joint to be replaced. If more than one MCP joint is to be treated, an incision is made across all the joints. The soft tissues are spread to expose the joint.
Preparing The Bones
The damaged ends of the bones are cut away to prepare the surface for the implant. The ends of the bones are carefully prepared with a burr and special instruments to create channels for the implant.
Inserting The Implant
The ends of the implant are implanted into the bone ends. The soft tissues around the joint are repaired to stabilize the joint and the implant.
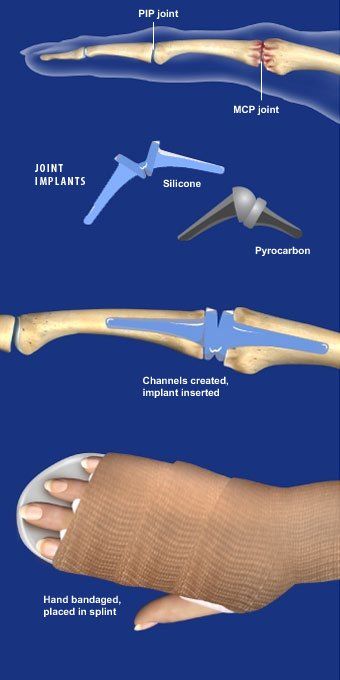
End of Procedure And Aftercare
The incision is closed with sutures and the hand is bandaged. A splint is applied to protect the joint while the hand is healing. Hand therapy will be required.
© Swarm Interactive, Inc.
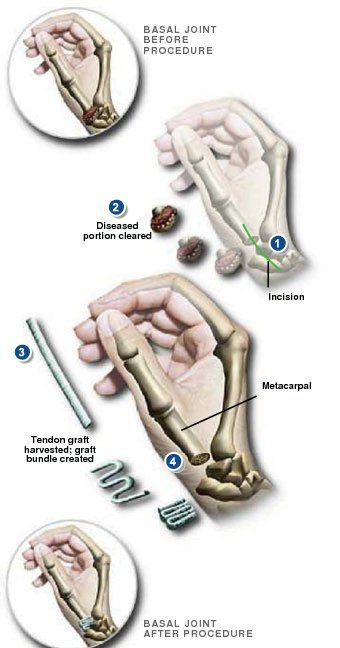
BASAL JOINT SURGERY
Overview
Pain in the basal joint caused by arthritis makes it difficult for patients to grip and hold or twist objects between the thumb and fingers. This surgical procedure removes and rebuilds the basal joint.
Accessing The Joint
An incision is created at the lower section of the thumb and the wrist area where the basal joint is located.
Joint Removed
The surgeon removes the diseased joint by cutting and clearing away the lower portion of the thumb metacarpal and also removing the trapezium bone at the base of the thumb.
Tendon Reshaped
A section of tendon (or graft) is taken from another part of the patient's own wrist or arm and reshaped into a bundle that will fit into the cleared joint.
End Of Procedure
The graft bundle is placed into the joint space. After the surgery site heals, the bundle of tendon graft will act as a cushion for the new basal joint.
© Swarm Interactive, Inc.
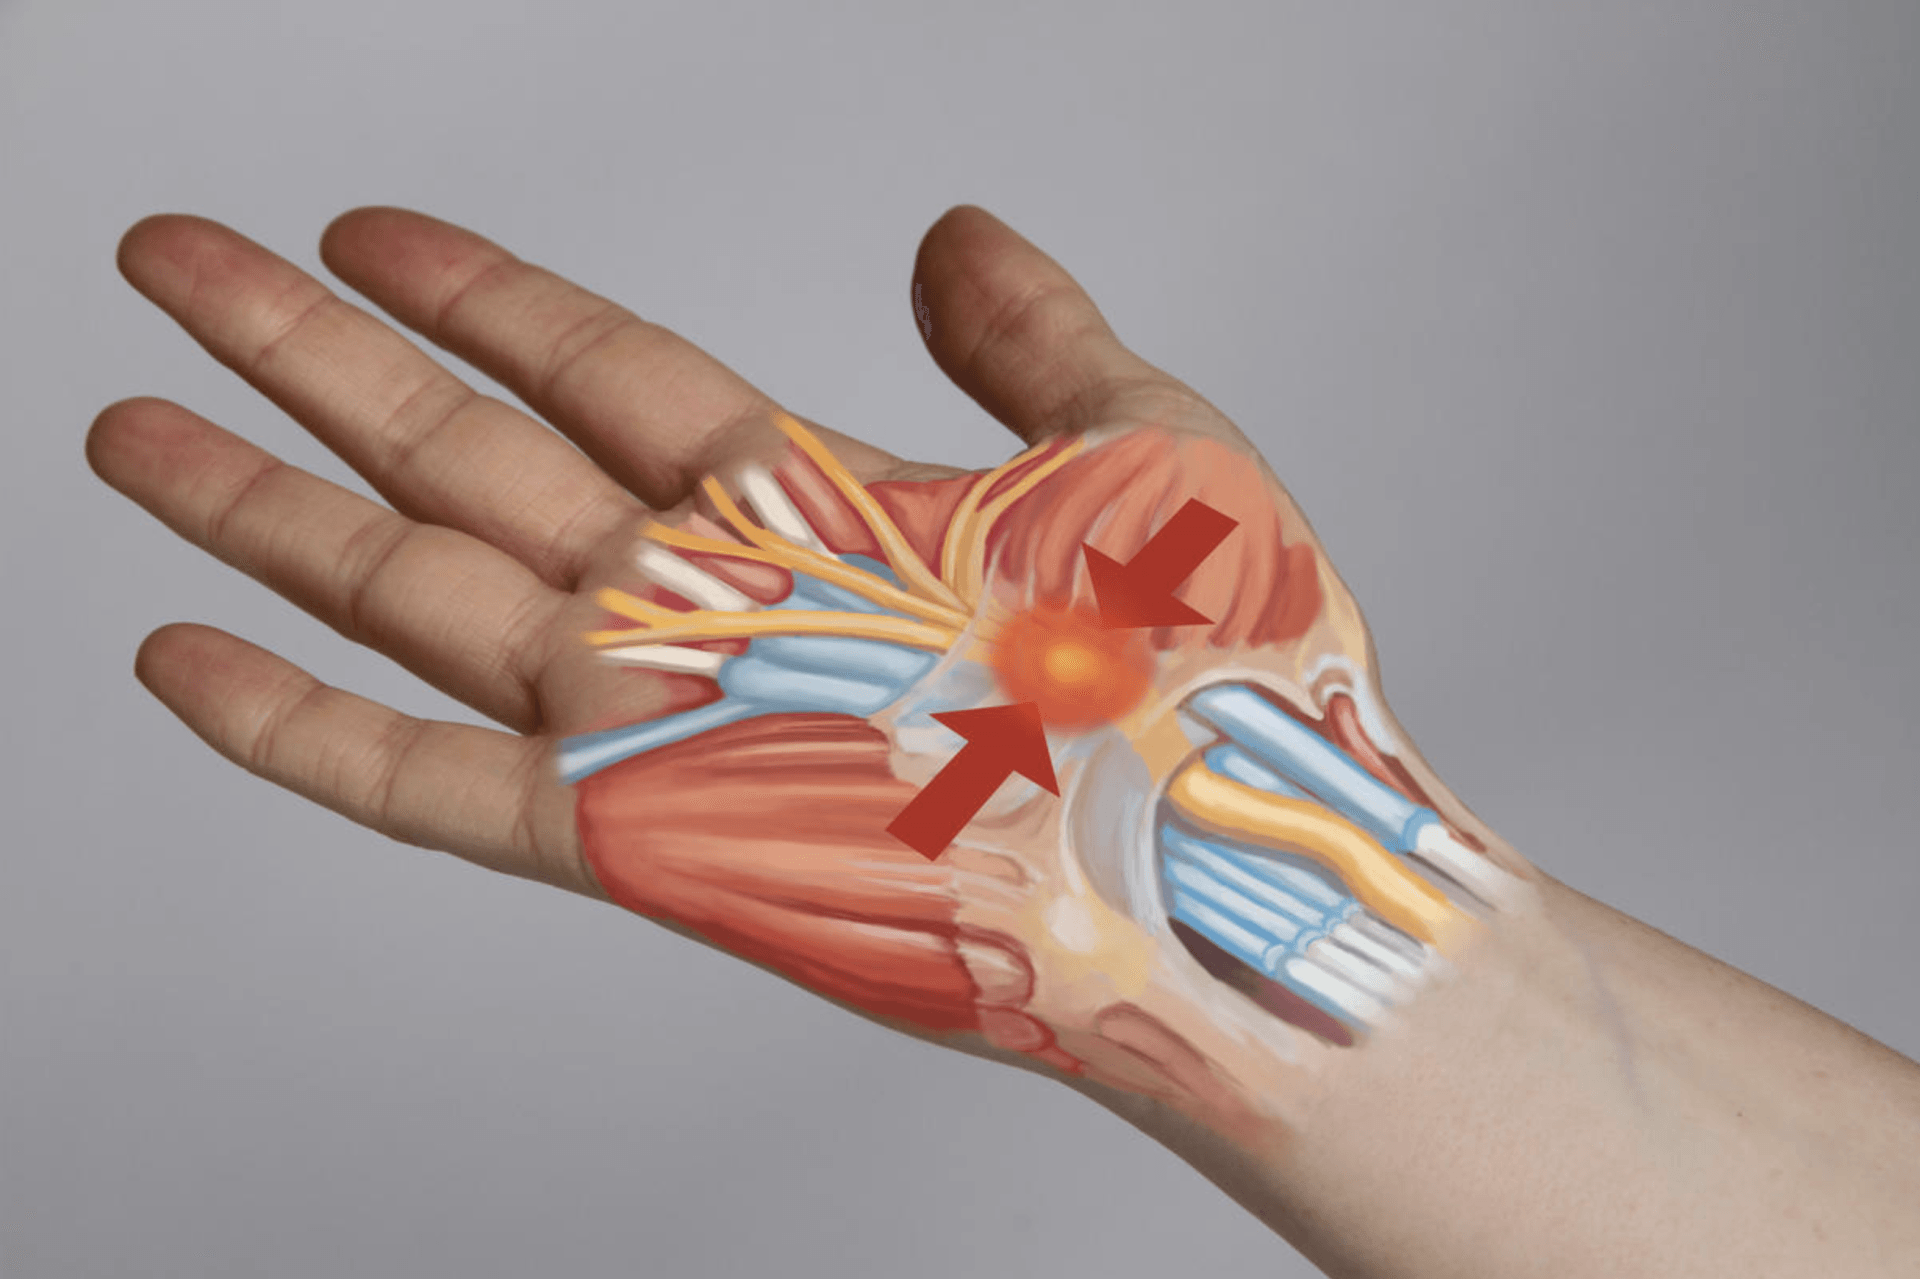
Carpal Tunnel Release
Overview
We can treat the pain of carpel tunnel syndrome by taking pressure off the median nerve. That's a nerve that travels through your wrist.
Preparation
To begin, your wrist and hand are numbed. A small opening is made in your skin. A small cutting instrument is put through the opening and guided to a band of tissue called the "transverse carpal ligament." This ligament spans across the carpal bones of the hand. It forms the space called the
"carpal tunnel."
Relieving the Pressure
The surgeon uses the cutting instrument to cut through the ligament while keeping your nerves and tissues safe. Cutting the ligament makes more space in the carpal tunnel. That relieves pressure on the median nerve.
End Of Procedure
Finally, the opening is closed. You'll be watched for a brief time, and then you can go home. Your healthcare provider will give you instructions to help your recovery.
© Swarm Interactive, Inc.
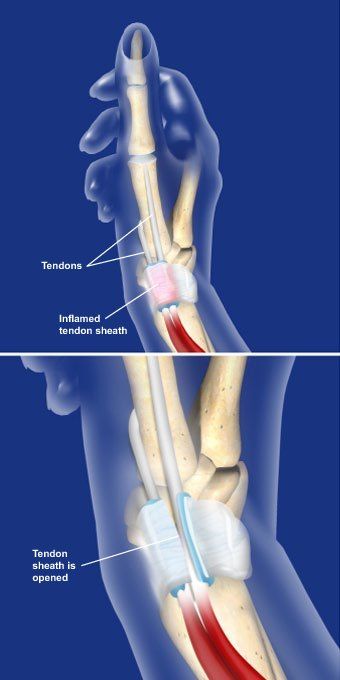
DE QUERVAIN’S RELEASE
Overview
This outpatient procedure relieves the symptoms of De Quervain's tenosynovitis by releasing the tendon sheath that wraps around the tendons at the base of the thumb. This relieves pressure and friction on the tendons, allowing them to glide freely.
Preparation
The patient is positioned, anesthesia is administered, and the hand and wrist are cleansed and sterilized. The surgeon creates a small incision on the wrist at the base of the thumb to access the inflamed tendons.
Opening The Sheath
The surgeon carefully releases the inflamed sheath surrounding the tendon, allowing it to spread open. In many cases, a second sheath is found inside the first. It is released as well. The surgeon may also remove any thickened tissue found between the tendons. Creating more space for the tendons relieves painful pressure and eliminates the friction that can occur as the hand is used.
End Of Procedure
The incision is closed, and a local anesthetic may be injected for post surgical pain relief. The wrist is bandaged, and a splint may be applied. The patient is given pain medication and is able to go home the same day. Thumb motion is usually encouraged after surgery.
© Swarm Interactive, Inc.
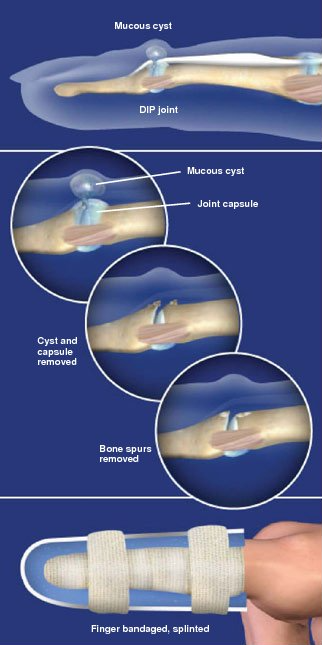
DIGITAL MUCOUS CYST EXCISION
Overview
This outpatient procedure is used to remove a mucous cyst, a small, fluid-filled sac that forms on back of the finger near the base of the fingernail.
Preparation
This procedure is performed in the operating room under sterile conditions. Anesthesia is administered, a touniquet is applied, and the hand is cleansed and sanitized. The patient is positioned with the back of the hand clearly visible to the surgeon.
Accessing The Cyst
A small incision is made over the DIP joint - the joint nearest the fingernail. This allows access to the cyst and the joint. The shape of the incision will vary depending on the size and location of the cyst and the surgeon's preference. If the cyst involves a portion of the cuticle, a skin flap may be created to remove the cyst and recreate the cuticle.
Excising The Cyst
The surgeon carefully retracts the extensor tendon and then removes the cyst and the dorsal joint capsule. Because mucous cysts are usually caused by joint arthritis, the surgeon examines the joint and removes any bone spurs that may have formed. This reduces joint pain and decreases the chance of recurrence.
The incision is closed with sutures. The finger is bandaged and splinted. The patient is given pain relievers and is able to leave the hospital following the procedure.
© Swarm Interactive, Inc.
DIGITAL NERVE REPAIR
Overview
This microsurgical procedure is used to reconnect the severed ends of a nerve in the hand to allow the nerve to heal and to reduce the possibility that a neuroma will form. Nerve repair can help restore sensation and muscle function, however, in many cases normal sensation and function is not fully restored.
Preparation
After anesthesia is administered, the surgeon uses an operative microscope to identify the damaged ends of the nerve. The nerve consists of two parts, an outer covering, called the epineureum (or nerve sheath), and tiny bundles of nerve fibers, called fascicles, which carry nerve signals. The surgeon will reconnect the nerve sheath, allowing the nerve fibers to rejoin.
Repairing With Sutures
The surgeon trims the ends of the lacerated nerve to expose healthy tissue. If the ends of the nerve can be brought together without creating tension, the surgeon sews them together with fine sutures placed in the epineureum. For larger nerves with both motor and sensory function, the surgeon will also align the groups of fascicles, and may sew them together as well.
Repairing With Nerve Conduit
If a portion of nerve is missing, or if there is too much tension to pull the ends together, a nerve conduit may be used to bridge the gap. The conduit is usually a soft tube made from absorbable material or silicone, or a piece of vein harvested from the patient's body. Fine sutures are used to attach the nerve ends to the ends of the conduit, creating a channel to guide the nerve fibers as they grow together and reconnect.
Repairing With Nerve Graft
In some cases for large nerves such as radial or ulnar nerves, the surgeon may need to bridge the gap with a nerve graft. The graft is a segment of a large sensory nerve harvested from a less critical place in the patient's body, typically the back of the leg. The surgeon carefully prepares the harvested nerve by forming a bundle called a cable graft. The surgeon lines up the fascicles of the graft with the fascicles of the nerve ends and anchors the graft with fine sutures.

End Of Procedure
The skin is closed, and the finger is bandaged and usually splinted. After a month the nerve fibers will begin to regrow at a rate of one millimeter per day, or one inch per month. The patient may experience a prickly sensation or hypersensitivity as the nerve fibers heal. Hand therapy will be needed to help reduce the sensitivity and retrain the nerve.
© Swarm Interactive, Inc.
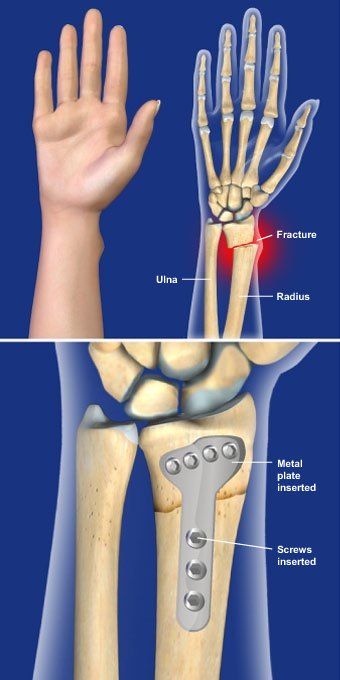
DISTAL RADIUS FRACTURE REPAIR WITH VOLAR PLATE
Overview
This procedure uses a metal implant to stabilize a fracture in the radius near the wrist. The radius is the largest of the two bones of the forearm.
Preparation
The patient is positioned so that the surgeon has access to the palm side of the forearm. The area is cleaned and sterilized, and anesthetic is administered.
Accessing The Fracture
The physician creates an incision along the palm side of the forearm to access the end of the radius. The broken bones are carefully realigned.
Stabilizing The Radius
A metal plate shaped to fit the contours of the radius is inserted and positioned against the bone. Screws are used to anchor the plate to the bone, stabilizing the radius.
End Of Procedure And Aftercare
The incision is closed with sutures, and the the arm is bandaged and placed in a splint. The patient will go home the same day. The patient may be placed in a cast or removable brace after the swelling from surgery decreases. Hand therapy is usually required.
© Swarm Interactive, Inc.
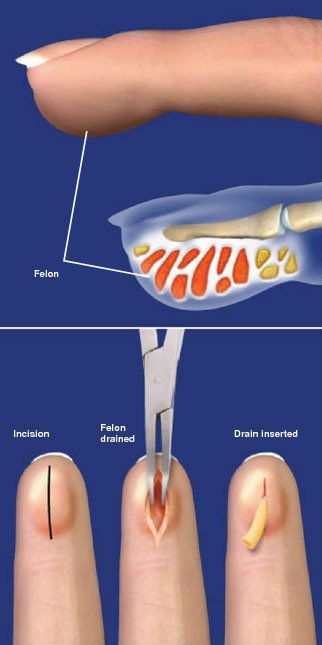
FINGER FELON DRAINAGE
Overview
The purpose of this procedure is to drain the pus and relieve the pressure and pain that results from an abscess in the pad of the fingertip, called a felon. Although commonly performed on an outpatient basis, severe infections may require hospitalization and antibiotics.
Preparation
The patient is positioned, and the hand is cleansed and sanitized. Local anesthesia may be administered based on physician preference depending on the degree of swelling. In severe cases, general anesthesia may be used so that the patient is asleep during the procedure.
Draining The Felon
The surgeon makes an incision to access and expose the infected area. The location of the incision depends on the size, location and severity of the felon. The incision is commonly made either on the underside of the finger over the point of maximum swelling or on the side of the finger. The infected chambers are opened, the pus is drained, dead skin or tissue is removed, and the wound is irrigated.
End Of Procedure
The wound may be held open with a small rubber drain or packed loosely with gauze, and a loose bandage is applied.
After Care
The patient is usually required to soak the finger two to three times a day in a solution of hydrogen peroxide, saline or soapy water until the wound is healed. Most patients completely heal within 3 to 4 weeks. In some cases, hand therapy may then be required because of scar sensitivity.
© Swarm Interactive, Inc.
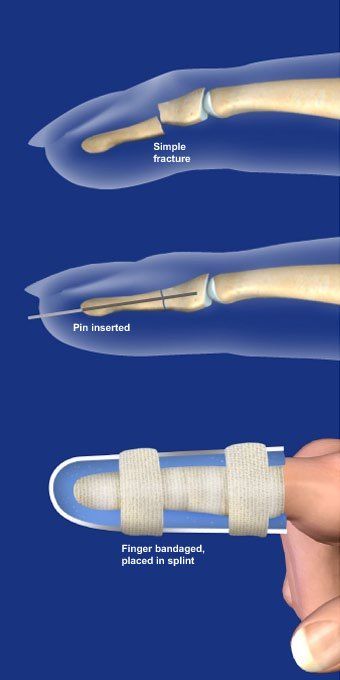
FINGER FRACTURE FIXATION
Overview
This procedure uses pins, screws or metal plates to repair broken bones in the fingers. The actual fixation method will depend on the location and pattern of the break.
Preparation
The patient is positioned so that the hand is clearly visible to the surgeon. General or regional anesthesia is administered, and the hand is cleansed and sterilized. A tourniquet is applied.
Accessing The Finger
If the fracture can be held together with pins, an incision is not often necessary. If the fracture cannot be stabilized using pins, the surgeon will make an incision on the top or side of the finger, depending on the location and pattern of the fracture. In some cases, an incision may be made instead on the palmar side of the finger.
Repairing The Damage
The surgeon realigns the fractured ends of the bone. If pins can be used, they are placed through the skin and into the bone using a special drill. The ends of the pins will remain outside the skin so they can be removed after the fracture heals. Often, if pins cannot be used, tiny screws are used to secure the fracture. For certain fractures, a metal plate will be inserted and held in place with screws.
End Of Procedure
If an incision was made, it is closed with sutures. Local anesthesia is administered for pain relief. The finger is bandaged and placed in a protective splint. Patients typically go home the same day. Elevation of the hand is encouraged to reduce swelling and pain. Pins are usually removed from 3 to 6 weeks after surgery. Screws and plates are not removed unless problems develop.
© Swarm Interactive, Inc.
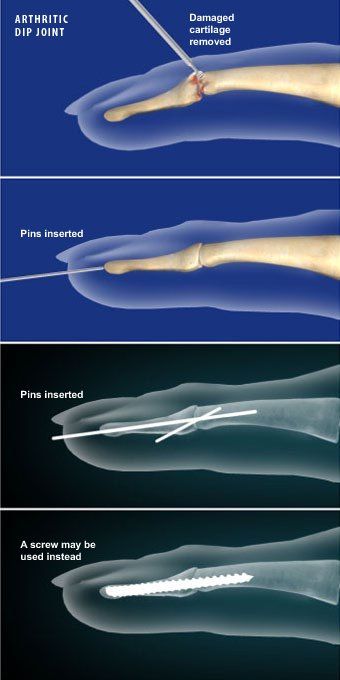
FINGER JOINT FUSION (DIP JOINT)
Overview
This outpatient procedure is used to resolve the pain of a severely arthritic joint of the finger by permanently stopping finger movement. This is most commonly used for the joint nearest the fingertip, called the DIP joint, although any joint in the finger can be fused.
Preparation
The patient is positioned to allow the physician full access to the hand, and the finger is cleaned and sterilized. Anesthesia is administered and a tourniquet is applied.
Preparing The Joint
The surgeon makes an incision along the top of the finger to access the joint. The cartilage is removed completely from both sides of the joint and the ends of the bone are prepared so they fit closely together.
Securing The Fusion
The ends of the bones are aligned and secured together using pins, a plate, or screws. Usually over a period of six to eight weeks the ends of the bones will heal together into a solid fusion.
End Of Procedure And Aftercare
The incision is closed with sutures and a local anesthetic is usually administered for post-procedure pain relief. After the bandage is in place, the finger is placed in a splint to protect the joint. The splint is usually worn to protect the joint until fusion has occurred. Elevation of the hand is encouraged to decrease swelling and pain.
© Swarm Interactive, Inc.
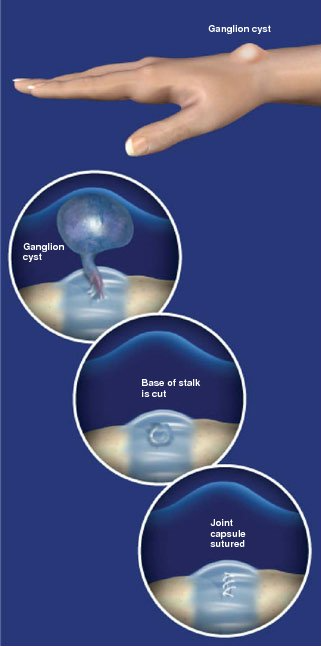
GANGLION CYST REMOVAL
Overview
This outpatient procedure is used to remove a ganglion cyst, a fluid-filled sac that forms as a herniation from a joint capsule, ligament or tendon sheath. Ganglion cysts commonly develop at the wrist.
Preparation
This procedure is performed in the operating room under sterile conditions. Anesthesia is administered, a tourniquet is applied, and the hand is cleansed and sanitized. The patient is positioned with the back of the hand clearly visible to the surgeon.
Accessing The Wrist
A small incision is made on the wrist, just above the location of the cyst. The surgeon isolates the cyst from the surrounding tissues in the wrist and locates the base of the cyst stalk, where the cyst is attached to the joint capsule, ligament, or tendon sheath.
Removing The Cyst
The base of the ganglion stalk is cut at its origin. The cyst is removed and the defect in the joint capsule, ligament, or tendon sheath may be repaired with sutures.
End Of Procedure
The incision is closed with sutures, and a bandage is applied. An injection of local anesthesia is often given for pain relief. The wrist is placed in a splint, and the patient may go home the same day as the procedure.
© Swarm Interactive, Inc.
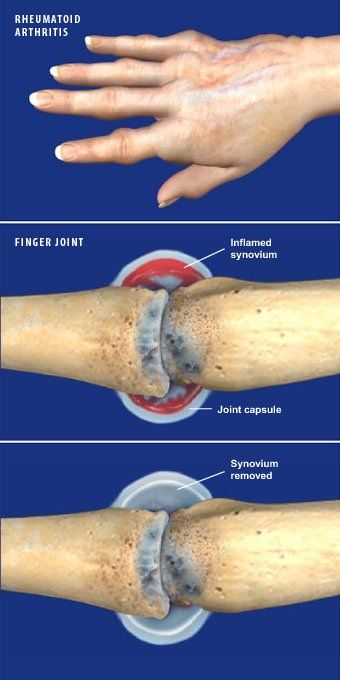
JOINT SYNOVECTOMY
Overview
This procedure removes diseased or damaged synovium, a thin layer of tissue that lines joint capsules and tendon sheaths and provides lubrication for movement. The synovium can be inflamed for a variety of reasons, most commonly rheumatoid arthritis.
Preparation
After anesthesia is administered, the hand is cleaned and sterilized and positioned so that the affected area is clearly visible to the surgeon.
Accessing The Joint
For the joints the fingers, an incision is usually made on the top of the involved joint to allow direct access to the joint capsule, synovium, and articular surface. Larger joints may be treated arthroscopically through two or three small incisions.
Removing The Synovium
After entering the joint, the surgeon removes the diseased and inflamed synovium from the joint capsule. If needed, the surgeon may also perform other repairs such as ligament repair or soft tissue reconstruction.
End Of Procedure
The incisions are closed with fine sutures, and a bandage is applied. Local anesthetic is usually injected for pain relief after the procedure. A splint is usually applied to protect the hand as it heals, and elevation is encouraged to minimize postoperative swelling.
© Swarm Interactive, Inc.
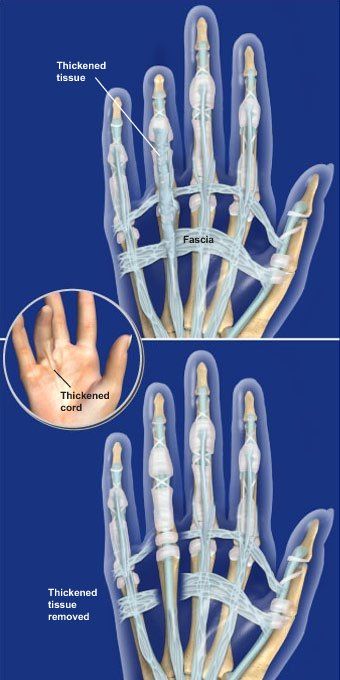
LIMITED PALMAR FASCIECTOMY
Overview
This surgical procedure is performed to treat fingers that have become flexed because of Dupuytren's contracture. In this procedure, the thickened and contracted part of the fascia - the layer of tissue just beneath the skin - is removed. There are many variations of this surgery based on the severity of the condition.
Preparation
The patient is positioned so that the palm of the hand is clearly visible to the surgeon. A regional pain block is often administered prior to general anesthesia. The hand is cleansed and sterilized and a tourniquet is applied.
Removing The Fascia
One of several types of incisions is made to access the fascia of the palm and the involved fingers. Digital nerves and arteries are identified and protected. The thickened cords of the fascia are then carefully removed to allow the finger to extend more normally. If the skin is severely affected by the contracture, the skin may be removed and a skin graft applied.
End Of Procedure
The incision is usually closed with sutures. In some cases, the incision may be left open to drain. If the wound is closed, a small drain may be placed under the skin. A bandage and splint are applied. Elevation of the hand after surgery is recommended. Most patients are able to go home the same day. Hand therapy will be required.
© Swarm Interactive, Inc.
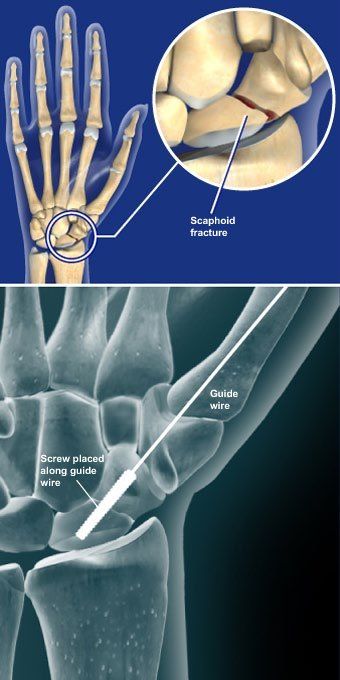
SCAPHOID FRACTURE OPEN REDUCTION AND INTERNAL FIXATION (ORIF)
Overview
This procedure stabilizes a fractured scaphoid bone with screw fixation. The scaphoid is an important carpal bone of the wrist, which is critical in coordinating motion of the other carpal bones and the radius.
Preparation
After anesthesia is administered, the patient is positioned so that the palmar side of the hand is visible to the surgeon. The hand and forearm are cleansed and sterilized and a tourniquet applied. An incision is made over the end of the wrist to fully expose the scaphoid.
Inserting The Screw
The surgeon realigns the fractured ends of the scaphoid. Using a fluoroscope for x-ray guidance, a guide wire is drilled down through the center of the scaphoid across the fracture. A screw is placed over the guide wire and carefully implanted across the fracture. The screw compresses the fracture as its threads pass the fracture line.
End Of Procedure And Aftercare
The incision is closed and the wrist is bandaged. A splint or bulky dressing is applied and elevation is encouraged to control pain and swelling.
© Swarm Interactive, Inc.
TENDON REPAIR
Overview
This procedure, performed under general anesthesia, is used to repair a ruptured or severed tendon in the finger or thumb.
Preparation
The patient is positioned, anesthesia is administered, and the hand is cleansed and sterilized. The surgeon locates the ends of the tendons and carefully brings the two ends back together. The ends are trimmed and prepared for reconnection.
Reattaching The Ends
The physician uses fine sutures to stitch the ends of the tendon back together. These sutures are not strong enough for normal hand use, but they will hold the tendon together while it heals.
End Of Procedure And Aftercare
The incision is closed, and the finger and hand are bandaged. The hand and fingers are placed in a splint to allow protected motion as the tendon heals. Hand therapy will be needed.
© Swarm Interactive, Inc.

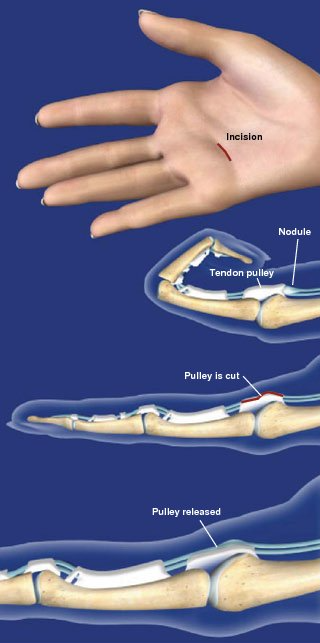
TRIGGER DIGIT RELEASE
Overview
During this minimally-invasive procedure, the surgeon opens a narrowed tendon pulley at the base of a finger or thumb affected by trigger digit. Opening the pulley prevents the nodule from catching, allowing the the affected digit to flex and extend normally with no triggering or pain.
Preparation
The patient is positioned so that the palm of the hand is clearly visible to the surgeon. Local or general anesthesia is administered and the area is cleansed and sterilized.
Accessing The Hand
After the hand is prepped, a tourniquet is applied. A small incision is made in the palm of the hand over the pulley to be released. The skin and soft tissue are spread to expose the tendon and pulley. The nerves are protected.
Releasing The Pulley
The surgeon uses surgical scissors or a scalpel to carefully divide the pulley, releasing the constriction on the tendon. The cutting of this pulley will not negatively affect finger function.
End Of Procedure
The incision is closed with sutures, and the hand is bandaged. The patient is given pain medication and is able to go home the same day. Finger motion is encouraged after surgery. Hand therapy may also be recommended.
© Swarm Interactive, Inc.
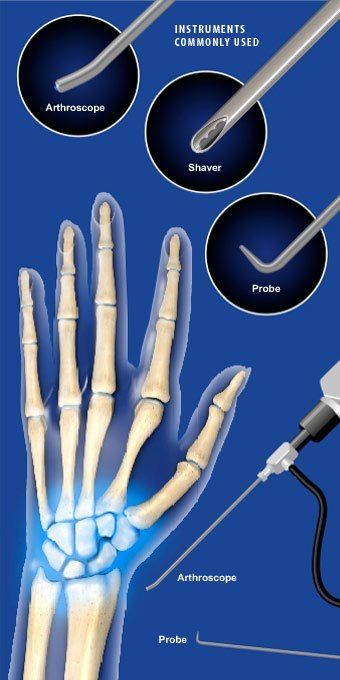
WRIST ARTHROSCOPY
Overview
This minimally invasive outpatient procedure allows the surgeon to evaluate and treat injuries and disorders of the ligaments, cartilage, and bones of the wrist. The surgeon uses a small camera, called an arthroscope, and tiny instruments which are inserted through small incisions in the wrist.
Preparation
The patient lays flat with the arm secured to an arm table and the wrist suspended vertically with traction. The arm is cleansed and sterilized, and a tourniquet is applied. General anesthesia is usually administered. Sometimes a regional nerve block may be used instead to numb the arm, and a sedative provided to relax the patient.
Accessing The Wrist
The surgeon uses a needle to inject fluid into the joint. Several small incisions are made on top of the wrist near the joint. An arthroscopic camera and a probe are then inserted. The camera eliminates the need for a large incision, as it allows the surgeon to view inside the joint on a monitor.
Joint Inspection
Irrigation fluid is pumped through the joint to provide a clear view. The surgeon uses the camera and probe to evaluate the ligaments, cartilage and bones of the wrist for signs of damage. A light on the arthroscope illuminates the inside of the joint.
Repairing The Joint
Once the wrist has been diagnosed, the physician may use one or more of the arthroscopic instruments to treat any damage. Loose or damaged cartilage may be removed, ligament tears may be repaired or debrided, and bone may be shortened. Severe damage may require more extensive surgery with an open incision.
End Of Procedure
The incisions are closed with sutures or surgical tape. Local anesthetic is administered to the wrist for pain relief. The wrist is then bandaged and usually splinted to immobilize the joint. The patient will be given pain relievers and is allowed to go home the same day.
© Swarm Interactive, Inc.
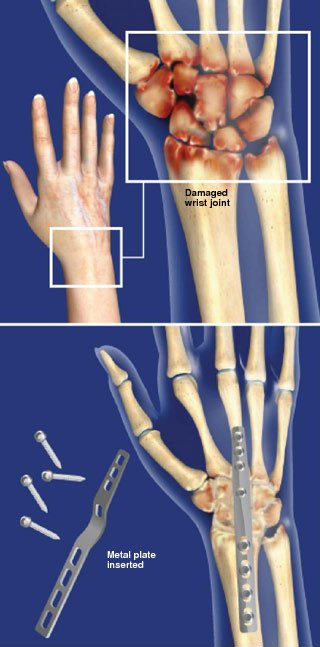
WRIST FUSION (TOTAL WRIST ARTHRODESIS)
Overview
This surgical procedure relieves pain and corrects deformities of the wrist caused by injury, trauma, arthritis, or genetic defect. The procedure fuses the radius, the carpal and metacarpal bones.
Preparation
After anesthesia is administered, the patient is positioned so that the back of the wrist and hand are clearly visible to the surgeon. The area is cleansed and sterilized, and a tourniquet is applied.
Accessing The Wrist
An incision is made along the back of the wrist to access the joint capsule. Using special instruments, any remaining cartilage is removed from the bone ends and the bony surfaces are contoured to fit together. Misaligned bones are repositioned.
Fusing The Joints
Bone graft is placed in the joint areas between the bones. A special metal fusion plate is inserted and positioned over the radius, carpal bones and metacarpal bone of the middle finger. The plate is secured to the bone with surgical screws. The metal plate will help to keep the bones of the hand in place while they fuse together.
End Of Procedure
The incision is closed and the wrist is bandaged and placed in a splint. Patients typically go home the same day after wrist fusion surgery. The patient is encouraged to keep the wrist elevated to help decrease pain and swelling. The wrist will be protected in a cast until bone fusion has occurred. Hand therapy is often required.
© Swarm Interactive, Inc.